02 Sep What is sound design in music production? A quick guide
what to expect?
Learning sound design in music production can be a pretty overwhelming and time-consuming process. If you are wondering how to get started with this topic, this is your article to read!
I divided this article into 3 parts to give you an overview of the most relevant information and at the end of it, I am giving you some practical tips for developing your sound design skills.
Hope that this will help you out!
table of contents
WHAT IS SOUND DESIGN?
A great starting point for understanding the different elements of sound design is to have a look at the definition of this term:
It is usually defined as creative work with different sounds and noises. Different techniques are used in lots of disciplines such as filmmaking, developing video games, theatre, radio production, and the music production scene.
Sound design for different virtual instruments even represents a separate branch, where the producer invents some sounds, that different audio engineers can use in their future compositions.
UNDERSTANDING SOUND
Before we can dive into different options for creating interesting sounds as a music producer, it is essential to understand the term “sound” in general.
In physics, the definition of this term is as follows:
"sound is a vibration that propagates as an acoustic wave, through a transmission medium such as a gas, liquid or solid."
If you want to analyze a sound, in particular, you have 6 experimental ways to identify its anatomy. To help you understand sounds in general, I will give you a shortlist with a clear definition for each one of them in the following section:
PITCH
The pitch of a sound defines how high or low we perceive a tone. This is equal to the frequency (= number of vibrations per time span) of an audible tone. We usually measure pitch with a unit called hertz.
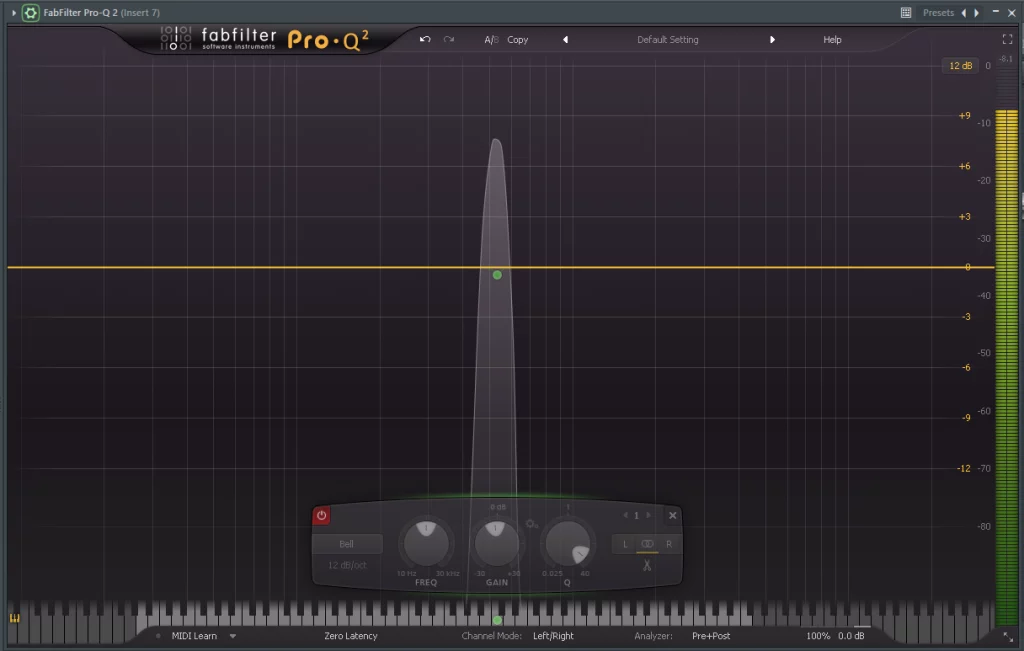
As humans, we are able to hear different tones that lay in between the frequencies of 20 – 20.000 Hz (= Hertz). Running the signal of a simple sine wave into an equalizer can be a pretty helpful representation of which frequency represents which tone.
In the graphic shown below, I used a basic synthesizer and pressed the C5 button on my MIDI-Keyboard. You can see that this causes a peak at around 530 Hz on the equalizer shown below.
When having a look at the frequency spectrum that is represented by this plugin, we can easily identify the ones that cause a peak and can get a great visual representation of the tones that are triggered by a VST.
duration
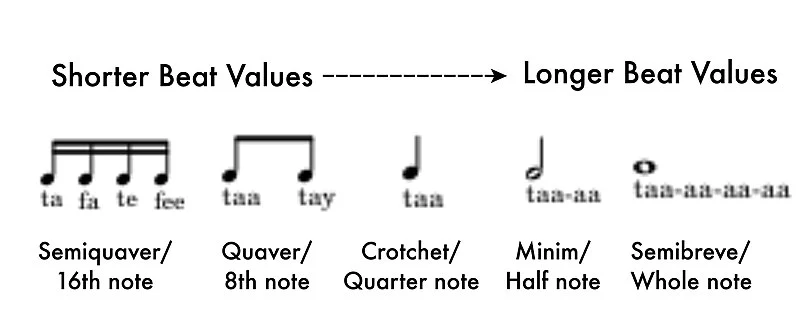
The duration of a sound defines how long or short we perceive it. The duration of the sound can be measured and described using the usual units of measurement for time (ms, s, min, etc.);
In conventional music notation, however, the different tone durations are usually represented with different note values, which cannot be read absolutely but are only related to one another in a relative manner.
LOUDNESS
This is probably the easiest term to understand. Loudness defines how “loud” or “soft” a certain sound is perceived by the listener.
One thing about loudness that is pretty essential to understand when it comes to music production is the different parameters that are used to measure it.
To understand this topic better, I would recommend you watch the video below:
TIMBRE
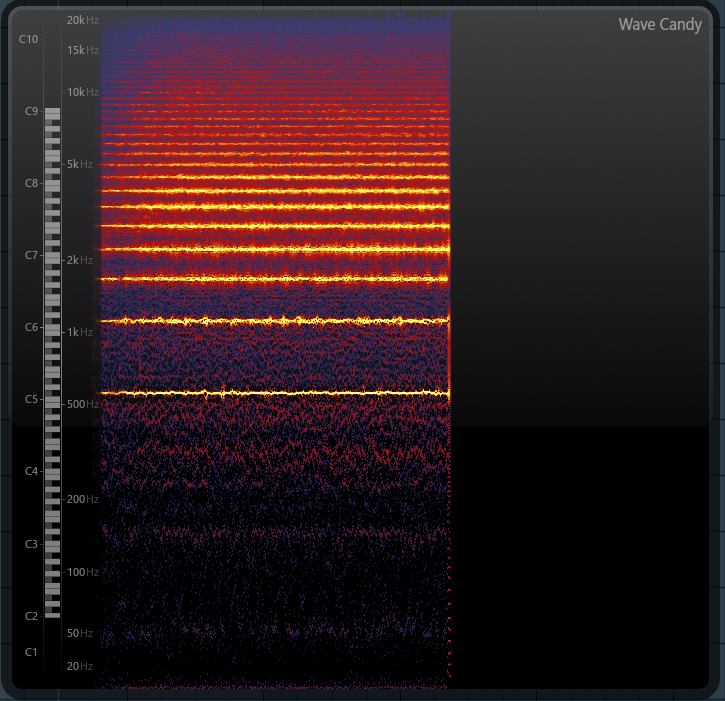
Timbre, which is also known as the tone color of an instrument, makes us distinguish different instruments from another, while they are even playing the same note. Analyzing different frequency spectrums can give us a pretty good visualization of this topic.
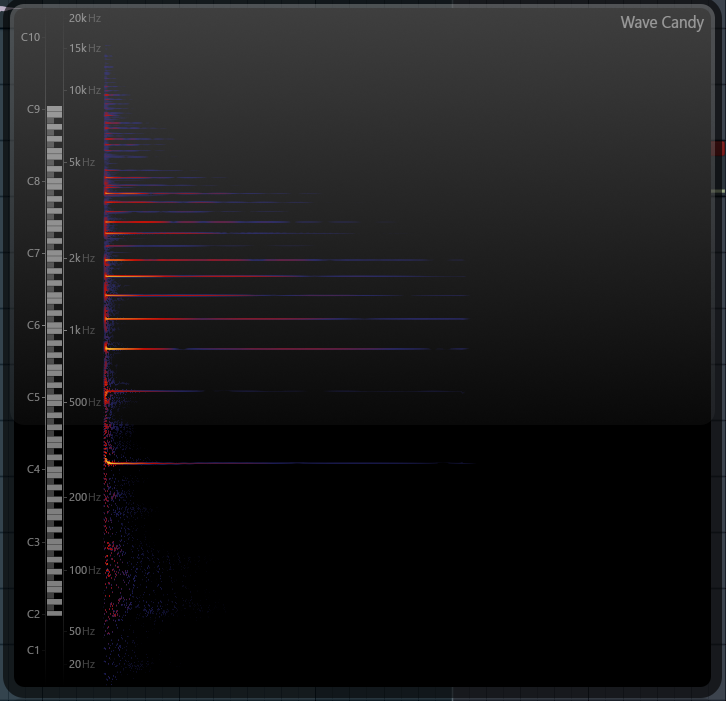
For this reason, I opened up the wave candy visualizer plugin in Fl Studio and made a screenshot of the spectrum of a trumpet, violin, and piano.
The analyzer represents the different frequencies that are triggered by the instruments on the Y-axis and the time on the X-axis.
You can see that while these instruments are playing the same notes, their behavior in which frequencies are hit at different loudness levels by these instruments is very different.

SONIC TEXTURE
Another thing that is essential to understand when it comes to sound is the musical texture. This usually defines how sound is organized.
It is often referred to as the difference between monophony, polyphony, and homophony.
Here is a short explanation for each term:
- Monophony: In music, monophony is when two musical parts are playing at the same pitch or pitches separated by intervals of one or more octaves. A great example for that is when two instrumentalists of a band are playing one section of a song exactly the same way.
- Polyphony: Polyphony is basically the opposite of monophony. When two instrumentalists of a band are playing different melodies at the same time, you would identify it as “polyphonic”.
- Homophony: Homophony is a texture in which a primary part is supported by one or more additional strands that flesh out the harmony. The difference between a homophonic and a monophonic melody is that with a monophonic melody only the same notes are played, while with a homophonic melody similar notes can be played in the same musical key.
Because this topic is pretty hard to understand without even having a practical example, I would recommend you watch the video below, which will help you to understand it better:
SPATIAL LOCATION
The last topic, that is essential to understand when we want to know how we perceive sounds is the spatial location and our ability to identify the location or origin of a detected sound in direction and distance.
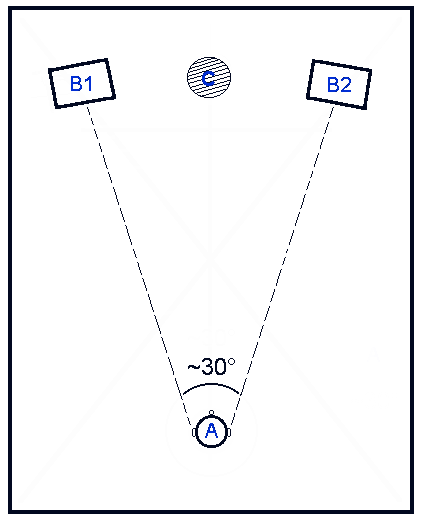
When we are listening to music through headphones or music speakers, we usually hear it in stereo using two different sound sources (e.g. left & right speaker from a pair of headphones).
In a DAW like FLStudio, Ableton, Cubase, etc., we have different options to manipulate the direction and distance of a sound and control its spatial location.
DIRECTION
Panning: Tuning the panning parameters inside of your mixer or any VST to the left and right is the most common way to control the perceived location of a sound.
This is also probably one of the most important parameters when it comes to mixing your tracks but that’ll be a topic for another article.
Quick note: Some more advanced effect plugins can give you more control for this and are able to modulate the panning behavior of a sound in a much more detailed way.
DISTANCE
Loudness: This one is pretty obvious: the louder a sound or instrument is, the “narrower” we perceive it. Think about it like you are hearing someone saying a sentence: When he is directly in front of you, his words will definitely sound louder than when he is 2-3 meters away
SFX: Some VSTs like Reverb or Delay try to emulate the effect that is created, when you are hearing a sound from a pretty long or short distance. This is a topic I included in this part of the article.
The following image is a pretty good visual representation of how we perceive the sound coming out of a regular stereo sound system:
UNDERSTANDING SFX
After we have understood the basic physics of sound in general, it is also essential to understand the different tools that will help us to manipulate sounds and develop an effective sound design process.
In this section of the article, I want to give you a general overview of the most common effects used in the sound designing stage of music production, so that you can get an idea about how you could use them.
I will also try to write a separate article about every plugin itself in the future that will explain them in more detail.
ECHO
In acoustics, echo is a reflection of sound that arrives at the listener with a delay after the direct sound. The most usual effects that try to emulate this acoustic phenomenon are reverbs and delays.
These effects have been used since the 1950s for music performance and recording. A delay can recreate the effect that happens when there is a long distance involved in the acoustic perception of a listener.
A reverb basically does the same but emulates a much shorter distance. These effects are great for creating a huge spacious environment and can also help your mix sound more natural, smooth things out, and glue your sounds together by creating a space for them to exist in.
EQ
Equalization or EQ is a powerful tool for music production. In the mixing stage, this is probably the most used effect by many producers, but can also be pretty useful for manipulating different sounds.
This effect is used to control the frequency spectrum of a piece of audio. Like said before, every instrument plays a certain range of frequencies, that defines its sound and along with other instruments like timbre. distinguishes it from other instruments.
PHASER
Phasers are very similar to flangers. The only difference between these two is, that a flanger delays and modulates the delay time of the entire signal of a sound while the phaser only affects specific frequency ranges. It is basically changing and modulating the phases of different frequencies in your sound.
CHORUS
Chorus effects are pretty similar to flangers in the way they work, but the desired effect is pretty different. If you imagine a real chorus (a group of singers) with everyone singing the same melody, each individual will sing at a slightly different pitch and with slightly different timing.
If the chorus is performing well, these differences are very slight and produce a certain kind of effect and fullness that is rather pleasant. This will happen when other instruments play in unison as well – that’s what chorus effects attempt to recreate.
TIME STRETCH
Time stretching tries to change the speed of an audio signal without affecting its pitch. This can be used to make a sample longer or fit it to the tempo of your current project.
Many different VSTs like Fl Studios Newtone or Serato Sample are using this algorithm, to manipulate the duration and timing of a sound.
FLANGER
Phasers are very similar to flangers. The only difference between these two is, that a flanger delays and modulates the delay time of the entire signal of a sound while the phaser only affects specific frequency ranges. It is basically changing and modulating the phases of different frequencies in your sound.
While the effect of this specific plugin can sound pretty “extreme” I would recommend you use it primarily in the sound designing rather than in the mixing stage of your song.
FILTER
Filters are being used to remove groups of frequencies from an audio signal. When looking at filters, there are different types that we can use to manipulate the frequency spectrum of certain sounds. For this reason, I created a shortlist with the most common filters used by many music producers:
- Low-Cut or High-Pass: Can be used to remove a whole bunch of low frequencies from your signal.
- Low-Pass or High-Cut: This filter type is the exact opposite of a low-cut filter. It lets through the low frequencies of the signal by removing all the high frequencies of a sound.
- Band-Cut Filter: Removes a region or a band of frequencies.
- Band-Pass filter: This filter type removes all the low and high frequencies from a point and keeps a band of frequencies in the middle.
- Notch-Filter: A notch filter is basically a band-cut filter but with a really narrow band, so it just affects a small group of frequencies
- Comb Filter: A comb filter is a series of really small notch-filters in a row, so they basically look like a comb.
DISTORTION
Distortion is a pretty versatile effect. If you want to add some extra bite or warmth to your sounds, it does the trick. There are many different types of distortion plugins such as bit-crushers, overdrives, or clipping effects. Covering every single type of distortion would go far beyond this article. I will definitely write another one that will explain this topic in the future.
PITCH SHIFT
The main goal of a pitch shifting effect is to shift a signal up or down in pitch. For example, a signal may be shifted an octave up or down. This usually affects the entire signal, and not each note separately. One very common application of this group is called “pitch correction” that you may also know as the “Autotune” effect. This effect tunes a musical signal to the correct pitch using digital signal processing techniques.
VOCODERS
Vocoder effects are pretty great for coming up with some great and unique sounds. There is a wide variety of ways. to use them. You could either go really extreme with it or could use it in a more modern/subtle way to use it as an incredible thickening trick.
This effect can be used to make a vocal sample sound more inhuman or robotic or to create some interesting sounds with a synthesizer of your choice. A lot of EDM producers like to use this effect to create the widely known “growl sounds” of popular dubstep productions.
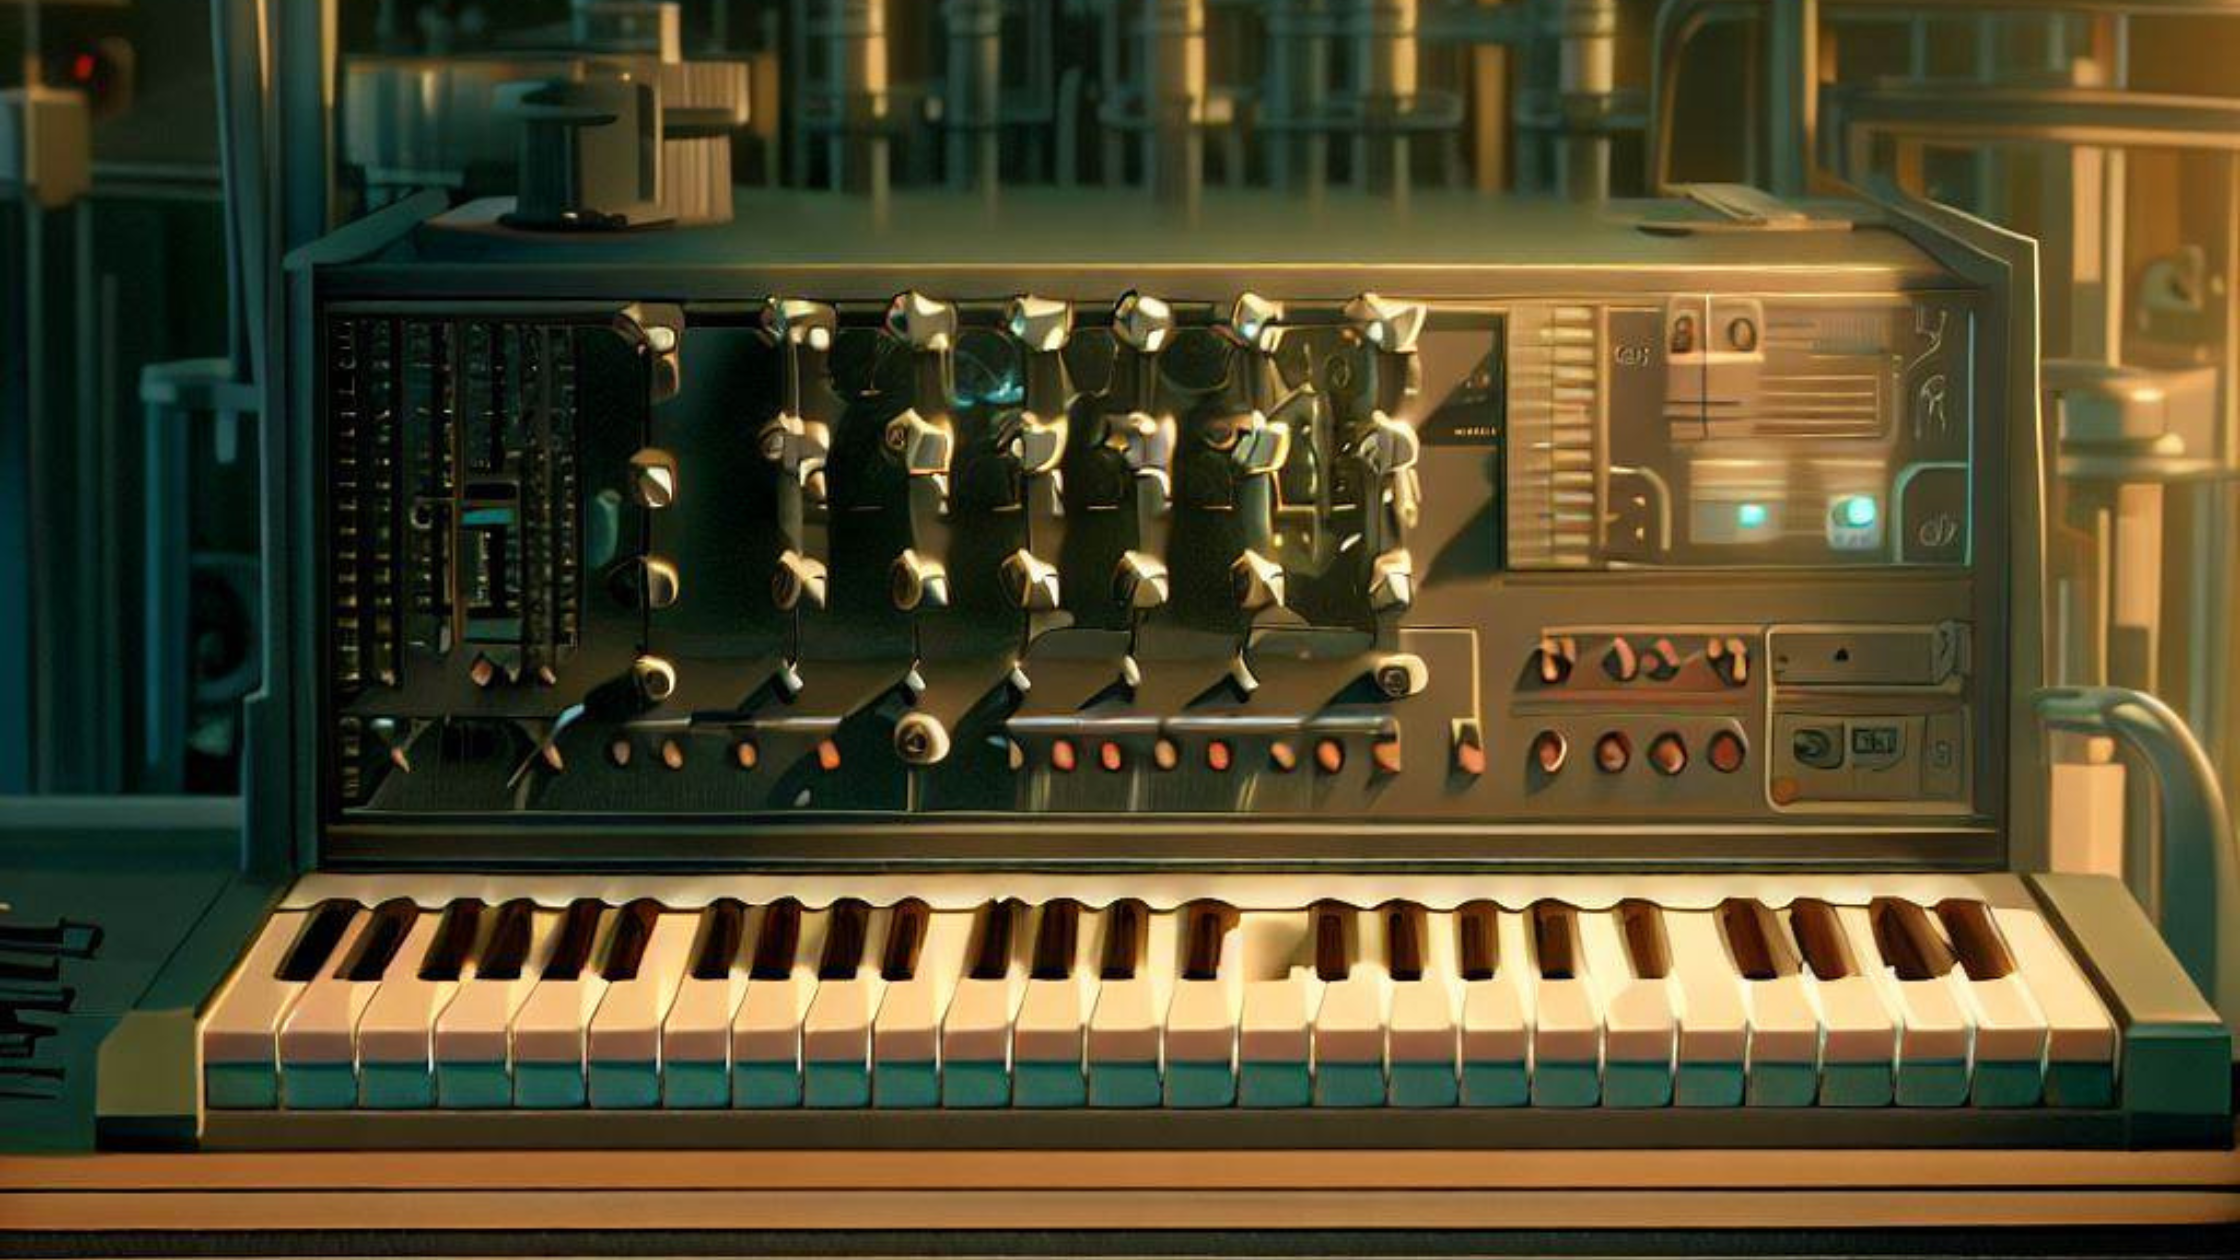
SYNTHESIZERS
Synthesizers are probably the most used instruments in electronic music production. To an average person, who has no knowledge about producing music, they may seem like some pianos with lots of knobs on them, but they’re actually much more than that!
Because there is such a huge variety of different synthesizers, you can easily recreate any physical instrument if you do have the right skills in sound design.
Some examples of popular synthesizers are the Minimoog and the Yamaha DX-7.
MODULATION
Modulation FX are very useful tools to manipulate your sounds. A modulator produces a signal that affects the settings of a specific target signal.
They give you the ability to control parameters on effects or instruments. A great example of a useful modulation effect inside of FlStudio is the Fruity PanOMatic. This tool helps you to modulate the panning of an instrument by simply tuning the speed and the amount of an LFO that affects the signal of a sound of your choice.
The most common modulator types include LFOs, ADSR envelopes, mod wheels, as well as step sequencers.
USEFUL TIPS
- Sound design is an art! Like it is with every skill that you want to develop, you will need to practice it a lot in order to see some results. Enjoy the process of learning and always try out some new things!
- Synthesizers, no matter if digital or analog, are instruments. Try to understand one specific synthesizer in the beginning. If you know your instrument well, you will definitely have more knowledge to benefit from in the future.
- Understand sound effects first! If you want to get creative with different FX, you will definitely need to understand them in order to use them correctly for your sound designing process.
- A friend of mine once said that each synthesizer has its own purpose – I totally agree with that! If you master one synthesizer perfectly, I would recommend you check out different other virtual instruments and experiment with them. Once you know the sound that you like, you will be able to slowly develop your own arsenal of different plugins to develop your own unique sound.
- When creating a song, you will have to go through different stages in order to finish them. I recently released an article about my process for finishing an EP, LP, or Album. If you are struggling with finishing any project, I would recommend you to read it as well. You can find it here. (Quick note: The borders between different stages of your song creation process are blurred. If you are at the mixing stage of a song, it doesn’t mean that you couldn’t do some sound designing steps in the mixing phase.)
- Learn something new every day. Expanding your knowledge and learning from others will definitely help you become a better sound designer in general. The internet is full of great tutorials, blogs, and other resource material to level up your skills!
- If you like the sounds of a specific producer, you could possibly find out which synthesizers and effects he is using on Equipboard. This could be a great point to start if you want to figure out, which tools you should dig into in order to create the music you like.
- Your DAW has lots of great VSTs! Before digging into some 3rd party plugins and eventually wasting some money on them, I would recommend you to learn how the stock plugins of your DAW work to get a better understanding of these effects. Once you have learned the basics, you could always expand your music arsenal with some additional tools.
- Take some presets as a starting point. The Presets of different VSTs are great! You can take them as a starting point and tweak them later on as you desire. You could also try to understand your preset of choice and analyze what you like about it. This will give you some helpful techniques that you could possibly use in some of your future productions.
- Sound design is not only limited to the use of different synthesizers – you could also experiment with different samples and put some FX over them. The opportunities are endless!
CONCLUSION
To sum it up: sound design is an art! You can get better at it by constantly learning new things about sound effects, synthesizers, frequencies, and sound waves. I would recommend you practice this craft by either recreating some high-quality sound design samples or presets.
Then you will get some creative ideas for tuning different parameters more effectively. The answer to the question: “What does a sound designer do?” is: he basically uses sound effects, samples, and Instruments to manipulate a source signal in a creative way.
If you get good at this craft, you could even find some sound design jobs to earn a living from your knowledge.
If you want to stay connected and get informed about my latest projects, make sure to follow me on social media.
No Comments